WHAT?
This post is a walkthrough on setting up a JVM service for continous integration & automatic deployments coupled with safe rollbacks.
What that means is, you can set things up such that every commit runs your test suite. If tests pass, it gets automatically deployed to a target environment. Things get even better with branching. For example, if you use git flow as your branching model, you can wire it up such that commits on develop branch get pushed to your beta/dev server and commits on master go to production server... automatically. You also get an ability to rollback your service to a previous version.
So, how do we do that?
Its pretty simple really; we deploy a Scalatra service in Elastic Beanstalk using Codeship + eb-deploy.
WITH?
Lets first do a quick review of the primary things we're working with:
-
Codeship is a seriously awesome continous integration service. If you're looking for a CI solution with automatic deployments, you'd do yourself a favor by giving them a shot. If you're a smallish project/team, their free plan now has you covered for upto 50 builds a month.
-
Elastic Beanstalk is Amazon's PaaS offering. Its practically free since you only pay for AWS resources that you actually use. You can deploy Node.js, PHP, Python, Ruby, .NET, and JVM based apps using Elastic Beanstalk. It also has auto scaling and rolling updates but we're not going to talk about that here.
-
Scalatra is a Scala centric JVM web service framework which offers all the basic stuff you need to build a system and then gets out of the way. It feels light & stays that way. Scalatra packages JVM apps as standard WAR files. For the purpose of this post, we'll be using a Scalatra project but all we're really doing is simply deploying the WAR file which comes from Scalatra. So you could also use any other framework which spits out a WAR file.
-
eb-deploy is a simple script i wrote to deploy a WAR file to Elastic Beanstalk. Amazon's Elastic Beanstalk documentation is very detailed but not very helpful when it comes to automating deployment of a WAR files. It is full of screenshots of Eclipse and has instructions which require running scripts in interactive mode. There is a SBT Play2 plugin and also [a python tool](There is ebs_deploy) which you should look at too.
HOW?
Setup your Elastic Beanstalk application
Use the AWS Console and create an Elastic Beanstalk Application and Environment. You can read more in Amazon documentation but to put it simply: an Application is, well your app and it can contain multiple Environments like dev/stage/prod. You actually deploy your stuff in your application's environment. Comprende?
It should be pretty straightforward to set it up but here is a quick walkthrough video of the options to choose:
As you set this up, be sure to make a note of these 3 things which we'll need later to configure deployment in Codeship:
- Application Name /
glugbot-demosin the walkthrough above but you will have your own - Environment Name /
glugbot-demo-envin the walkthrough above but you will have your own - Instance Profile /
aws-elasticbeanstalk-ec2-rolein the walkthrough above but you will have your own
You may want to checkout the sample which Elastic Beanstalk deployed to your new environment by going to the url displayed top in the AWS Console. In the above walkthrough it is http://glugbot-demo-env.elasticbeanstalk.com/ Remember, we will be updating this to our service via codeship!
Get your service code in Github
Codeship will monitor commits on your service code to trigger deployments. So lets put a simple Scalatra service in your Github account. For that, you could either
- Create a Scalatra service from scratch and push it to a Github repo that you can access from your Github account.
- Or just fork the sample Scalatra service I built for this blog post into your Github Account.
Setup your project in Codeship
Setting up your project on Codeship is so easy; its downright beautiful :) Here is a walkthrough where Codeship takes your Github project and does the first build/test:
At this point, you already have continuous integration working!
Configure Codeship to use eb-deploy
We'll configure Codeship to run eb-deploy script for pushing our service's packaged war file to Elastic Beanstalk.
eb-deploy script needs to know a few things about our app, to be able to deploy it. This includes the 3 things we'd called out above: our app's Elastic Beanstalk Application, Environment, Instance Profile. It also needs the WAR file location, the build number and your AWS keys.
eb-deploy can take all that information either as commmand line parameters or as environment variables:
usage: eb-deploy options

Deploy a war file to AWS Elastic Beanstalk. You can pass the params as options or have them be present as environment variables mentioned under the name specified for that option.

OPTIONS:
   -h   Show this message
   -w   war file location | $APP_WAR
   -v   build number	  | $CI_BUILD_NUMBER
   -k   AWS Key		   | $APP_AWS_ACCESS_KEY
   -s   AWS Secret		| $APP_AWS_SECRET_KEY
   -p   EB IAM Profile	| $APP_EB_InstanceProfileName
   -a   EB Application	| $APP_EB_ApplicationName
   -e   EB Environment	| $APP_EB_EnvironmentName
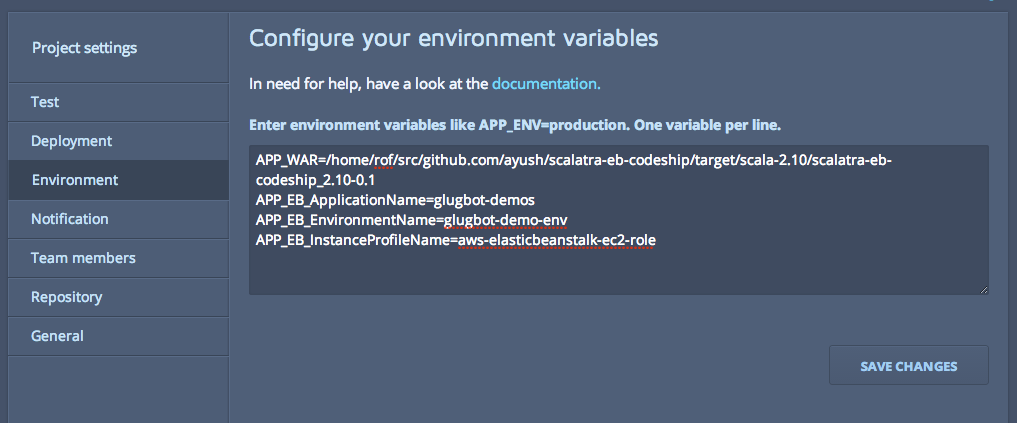
The way we'll set this up in Codeship is pass the IAM profile, application, environment and WAR file location as custom environment variables:
APP_WAR=/home/rof/src/github.com/ayush/scalatra-eb-codeship/target/scala-2.10/scalatra-eb-codeship_2.10-0.1
APP_EB_ApplicationName=glugbot-demos
APP_EB_EnvironmentName=glugbot-demo-env
APP_EB_InstanceProfileName=aws-elasticbeanstalk-ec2-role
This is done in Codeship's project settings as below:

The build number is provided by Codeship as a default environment variable called CI_BUILD_NUMBER and eb-deploy uses that directly so there is no need to configure it explicity.
We can setup AWSKey and AWSSecret as environment variables too. However, if there are security concerns on exposing them, we could commit a file in our code which invokes eb-deploy and passes the AWSKey and AWSSecret as command line options to eb-deploy. Since codeship destroys the entire VM it uses to perform our build, its a pretty safe bet that the keys are better protected that way. Of course, you do have to put it in your code though. If you don't wanna do that, then just define them as environment variables.
Automatic deployments
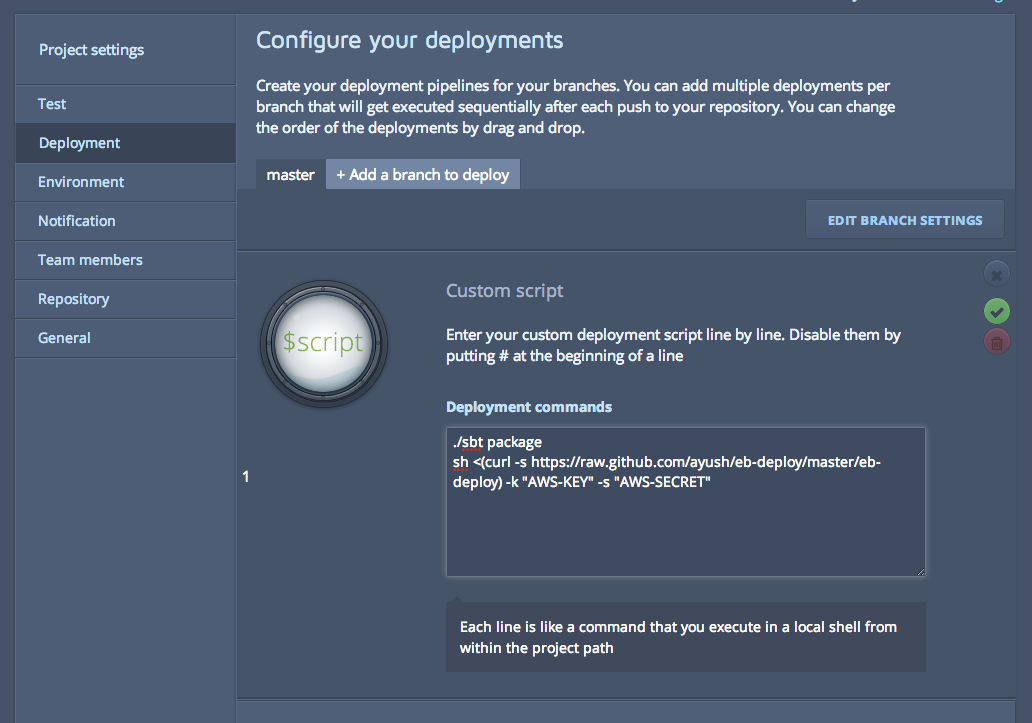
Lastly, we just need to invoke eb-deploy from codeship. Thats done from the Depoyment tab in Codeship as below:

Here are a few possibilities on how you can invoke eb-deploy:
- If the AWS Keys are defined as environment variables just invoke eb-deploy without any options
sh <(curl -s https://raw.githubusercontent.com/ayush/eb-deploy/master/eb-deploy)
- If you don't wanna curl + sh, just download eb-deploy and put it in your code, say in bin/eb-deploy. Then you'd simply invoke it as:
./bin/eb-deploy
- If the AWS keys are passed as options, you'd do:
./bin/eb-deploy -k "YOUR-AWS-KEY" -s "YOUR-AWS-SECRET"
- To use curl + sh here, you could:
sh <(curl -s https://raw.github.com/ayush/eb-deploy/master/eb-deploy) -k "YOUR-AWS-KEY" -s "YOUR-AWS-SECRET"
Now when you commit and push to github, codeship will automatically build, test and deploy your app service to Elastic Beanstalk. Here is a demo of that in action:
## Deploying branches to different servers To deploy a branch to another server, just use Codeship's [branch specific deployment piplelines](https://www.codeship.io/documentation/continuous-deployment/deployment-pipelines/), to setup another branch's deployment.